How to Read an
Outside Micrometer

 A micrometer generally provides greater precision than a caliper, but is limited
to a smaller range of lengths. For example, it would take a six-piece set of
micrometers to cover the range of a 6” caliper.
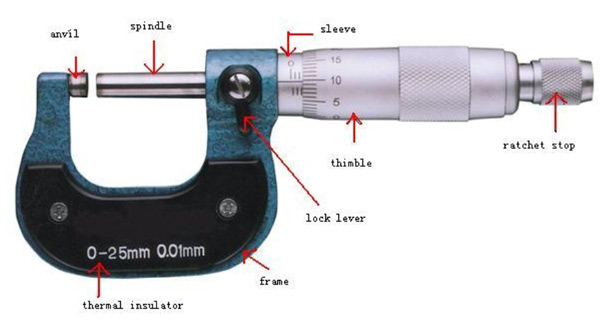
Parts of an Outside Micrometer

Proper Use and Care for a Micrometer
Be sure to unlock the locking lever before attempting to rotate the thimble.
Clean the measuring faces with a clean cloth before and after measurements.
It is also a good practice to occasionally clean the spindle to keep any
contaminants from being drawn into the sleeve. Use the grip on the thimble when
requiring a large amount of travel but as you come close to closing in on the
object to be measured use the ratchet stop so as to not over tighten the thimble
and give an erroneous reading. Never leave a micrometer exposed in the hot sun
and then attempt a measurement. This would also lend to an erroneous reading.
When a micrometer is at its minimum reading the horizontal line on the sleeve
should line up with the ‘0’ on the thimble. If that is not the case it will be
necessary to calibrate the micrometer by rotating the sleeve. Each micrometer
comes with a half moon adjusting wrench for this purpose. To make the adjustment
simply puzzle the wrench to the side of the spindle and insert the small tip
into the leverage hole. It will not require much effort to turn the spindle
however there is sufficient resistance in the spindle so that it will never move
on its own. Larger micrometers are supplied with standards to check for correct
calibration. When checking, be sure to hold the standard squarely between the
anvil and spindle. To help with this try rotating the standard slightly with
your fingers while gently turning the thimble as you close in on the standard.
- How to read an outside micrometer
Click to go to
1. Reading a .001” scale
2. Reading a .0001” scale
3. Reading a .01mm scale
4. Reading a .001mm scale
First of all, the basics:
The pitch of the screw thread on a standard spindle is 40 threads per inch. One
revolution of the thimble advances the spindle face toward or away from the
anvil face precisely 1/40" or 0.025" equaling the distance between two
graduations on the sleeve. The reading line on the sleeve is divided into 40
equal parts by vertical lines that correspond to the number of threads on the
spindle. Therefore, each vertical line designates 1/40" or 0.025". Every fourth
line, which is longer than the others, designates 0.100" and is numbered. The
beveled edge of the thimble is divided into 25 equal parts with each line
representing 0.001" and every line may or may not be numbered however every
fifth line is numbered consecutively. To read the micrometer in thousandths,
multiply the number of vertical divisions visible on the sleeve by 0.025", and
to this add the number of thousandths indicated by the line on the thimble which
best coincides with the central long line on the sleeve.
Now some examples:
How to read a micrometer graduated in 0.001"

Micrometer thimble showing 0.276 inch
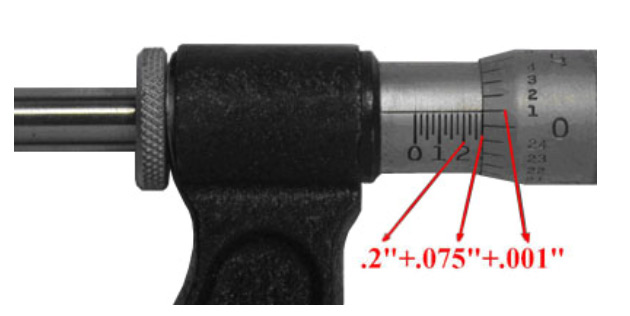
In the picture above, the thimble is positioned to where it is setting between
the 2nd and 3rd numbered graduation thus 2 x 0.100” = 0.200”. Past that there
are three additional sub-divisions, which is 3 x .025” = 0.075”. Lastly the
graduation 1 on the thimble is the closest to the central long line on the
sleeve therefore 1 x 0.001” = 0.001”. The reading thus would be 0.200” + 0.075”
+ 0.001”, totaling to 0.276".
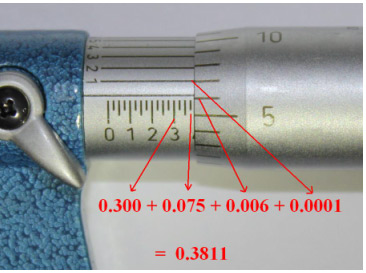
How to Read an Outside Micrometer Graduated in 0.0001" (using the extra vernier
scale).
Many micrometers include a vernier scale on the sleeve in addition to the
regular graduations. This allows measurements within 0.001 millimeters to be
made on metric micrometers, or 0.0001 inches on inch-system micrometers.
The additional digit of these micrometers is obtained by finding the line on the
sleeve that best coincides with the line on the thimble. The number of this
coinciding vernier line represents the additional digit.
-
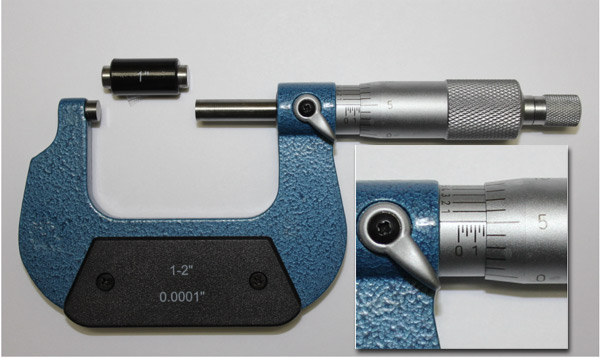
This next example uses a 1” to 2” micrometer (shown with the 1” standard).

The horizontal scale on the sleeve is marked with graduations every .025 (25
thousandths). Every 4th graduation (starting after ‘0’) is numbered
consecutively. These numbers represents 0.100 (4 x .025 = 0.100) which is read
as 100 thousandths.
The vertical scale graduations on the thimble represent .001 (1 thousandths).
Every 5th graduation is numbered for clarity.
The vertical scale graduations on the sleeve represent .0001 (tenth of a
thousandths). This is the vernier scale.

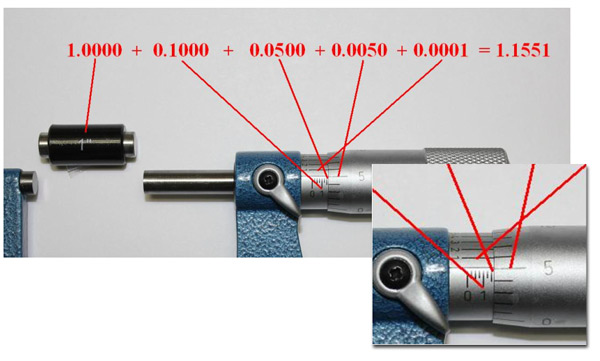
Micrometer reading 1.1551 inches
-
The reading for this example is determined by adding five separate figures.
And these are:
· Length of the standard - 1.0000
· The numbered graduation on the sleeve – ‘1’ or 0.1000
· Two additional graduations on the sleeve – 2nd line past the ‘1’ which is 2 x
.025 = .050 (50 thousandths).
· The number of thousandths on the vertical scale of the thimble - between 5 and
6 therefore .005
· The best match up of the two vertical scales which is 1 therefore .0001
Total of all five figures:
1.0000
0.1000
0.0500
0.0050
0.0001
is
1.1551 which is simply read as “1.1551 inches” or could be read as “one and one
thousand five hundred fifty one ten-thousandths of inches”.
Another example in inches using a 0” to 1” micrometer:

-
How to read a micrometer graduated in 0.01mm
-
The pitch of the screw thread on a metric spindle is one-half millimeter
(0.5mm). One revolution of the thimble advances the spindle face toward or away
from the anvil face precisely 0.5mm. The reading line on the sleeve is graduated
above the central long line in millimeters (1.0mm) with every fifth millimeter
being numbered. Each millimeter is also divided in half (0.5mm) below the
central long line. The beveled edge of the thimble is divided into fifty equal
parts, with each line representing 0.01mm and every fifth line being numbered
from 0-50. Thus, the number of millimeter and half-millimeter divisions visible
on the sleeve plus the number of hundredths of a millimeter indicated by the
thimble graduation, which coincides with the central long line on the sleeve,
give the reading.

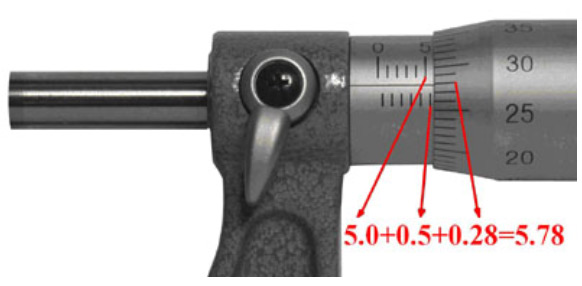
Micrometer thimble reading 5.78mm
In the picture above, the thimble is positioned to where the edge of the thimble
bevel is positioned between the 5th and 6th graduation on the upper side of the
scale thus 5.0millimeter. It is also past the next graduation on the lower side
of the scale thus an additional 0.5mm. Finally graduation 28 (.28) on the
thimble coincides with the central long line on the sleeve. The reading then
would be 5.00 + 0.5 + 0.28 = 5.78 mm.
How to read a micrometer graduated in 0.001mm

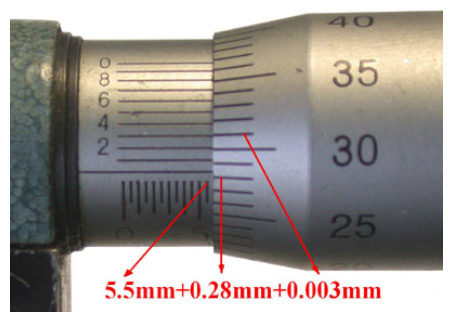
- Micrometer reading 5.783millimeters
In the above picture this micrometer has the additional vernier scale on the
sleeve. It is reading about the same as the previous example however a more
accurate reading can be obtained with this vernier scale. The #31 graduation on
the thimble lines up best with the .003 graduation mark on the sleeve. Thus the
reading would be 5.00 + 0.5 + 0.28 + .003 = 5.783mm.
For accurate readings on all precision measurements it is important to hold the
work piece squarely with the measuring tool. Consider purchasing a micrometer
stand that can serve as a ‘third hand’. A stand can greatly improve the accuracy
of a measurement and actually speed up the process especially when measuring
parts repetitiously.
Class Dismissed!
Purchase Our Products at the following retailers:
Close Window
![]()
 A micrometer generally provides greater precision than a caliper, but is limited
to a smaller range of lengths. For example, it would take a six-piece set of
micrometers to cover the range of a 6” caliper.